WHEN & WHERE:
Our garlic planting began in late October..on the 27th and 28th. My partners, David Dyck and J. Nowak and I were racing to get our garlic in days before the ground would freeze! We had recently attended the 2nd day of an awesome weekend garlic workshop taught by Jim Capellini at Rasa Creek Farm and now we were jumping in with both feet on 3 newly cleared acres of land at Fissipes Farm with 1/4 acre dedicated to planting garlic seed. It's our first big garlic planting foray. In 2014 and 2015 I planted a small raised bed in my home garden from a variety of garlic that had mysteriously come up in my yard, given that we never planted any! I have kept that variety and will be experimenting with it and naming it for future use.. will keep you posted on how it turns out :)
GARLIC QUANTITY & VARIETY:
For our 2015 fall season we bought all our garlic seed from Rasa Creek Farm and our main variety was Creme De La Rasa, RCF's own variety which we are super excited to have in the ground. Other varieties were Tibetan Purple, Yugoslavian, Chesnok Red and Kostyn's Red. We had about 2000 bulbs in total.

Sacks of Garlic Seed from Rasa Creek Farm - soon to be popped and planted
HOW WE PLANTED:
Everything was coming together at last, except we had to get a hold of a dimpler ASAP! We thought we'd borrow a dimpler from a neighbouring farm belonging to friends who used to plant garlic in large numbers but after seeing the dimpler it became clear it wasn't the right size. As a last minute plan we ended up commissioning the local mechanic - Jack - and his son to weld us a new one. Keep in mind it was ready the DAY OF PLANTING (shout out to our local mechanic who made it a priority cause they knew were up against the weather. It pays to live in a smaller community :) ) - It cost us $400 cash for the dimpler but it was well worth it! We also borrowed a rototiller from a neighbour's farm down the road and 1 person rototilled while 2 people walked the dimpler right behind the newly tilled soil. (see 2 images below)
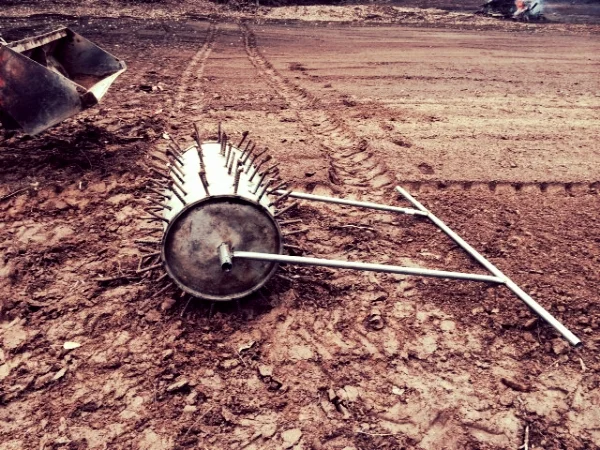
We called our dimpler "Mad Max"
HOW LONG:
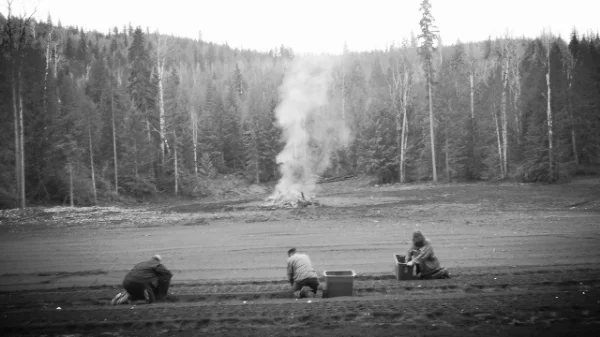
With luck on our side, we managed to get an extra pair of hands to help us pop and plant. We popped the seeds in a day with 4 people working around 3.25 hours each. (13 popping hours in total) The next 2 days were dedicated to planting - We planted in very comfortable 8-10 degree weather but were concerned for the overnight frost on the ground but luckily it was gone by the day and our soil was beautifully soft for planting. The first day was an afternoon planting from 2 - 6pm and the following was a morning schedule of around 9-11:30am. It took 4 of us about 4 hours each the first day and 2.5 hours the next. (About 25 hours of planting total- and that includes work with the dimpler and rototiller). Literally as soon as we were done the rain started to come down..gently at first. So we swiftly packed up and went inside for some hot chicken soup...with garlic :) - nothing quite as satisfying and relieving as getting the planting done just in time!
p.s. We delivered a bag of beautiful garlic from our popped seeds to an appreciative Jack and son the next day -:)
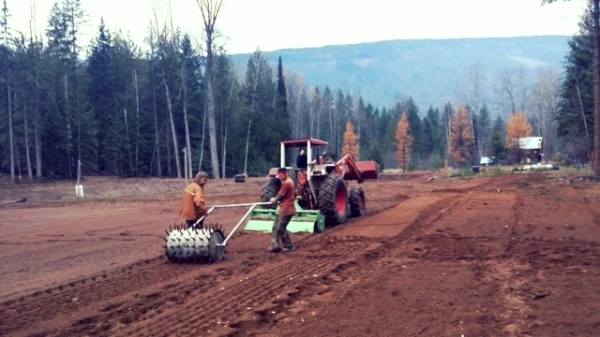
Walking the dimpler behind the rototiller
More Details & Field notes:
1. Dimpler
Our dimpler is made from a 45 gallon steel drum and has 7 spokes/row made of rebar. The spokes are spaced about 6 inches apart.
2. Fertilizer and Mulch
We didn't have enough time to use fertilizer or manure but we plan to add some in Spring - We will use composted poultry manure from Corfe's Farms in Armstrong on a suggestion by Jim at RCF. They were out of product when we contacted them in October so we will revisit the idea in early spring when we still have a chance to apply the fertilizer. We didn't have time to mulch either.. we ordered corrugated Kraft paper for mulch from Kamloops and we plan to apply it this spring when the snow melts.
3. Rows
We have 7 Rows total - field 45.5 feet wide total - Each row is 3 feet wide and we have 2.5 feet between rows - See our garlic map below which was drawn with a sharpie on plywood so it will last and not get lost!
Field Tips:
1. It worked really well for us to place our 5 different varieties of popped bulbs into labelled rough neck containers. Each planter would focus on completing their rough neck full.. and we would work on opposite sides of the field and plot and meet up in the middle so as to not get in each other's way.
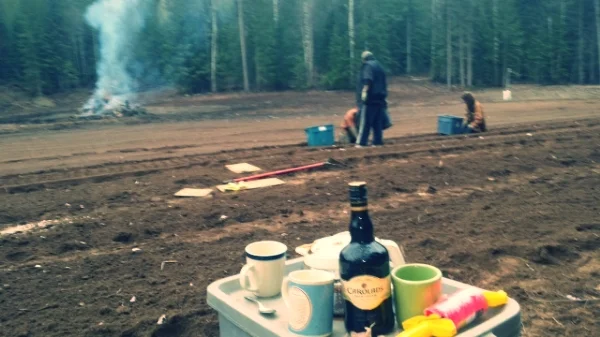
2. Another important tip :) - Planting in 8-10 degree overcast weather lends itself to a couple of coffee breaks for a little lift in spirits... and a dash of Carolan's in your brew doesn't hurt!